Kair Mould Control Paints & Cleansers

This pack contains all you need to convert an ordinary decorative paint into a mould resistant coating for walls and ceilings. Please read and understand all the instructions and safety precautions carefully before you start.
Now You Can Turn Any Paint into a Mould Destroyer – Make your walls mould proof!
Product Features
Can be used with
- Emulsion paint
- Egg shell paint
- Tile grout
- Gloss paint
- Wallpaper paste
- Coatings
After adding to your coating, stir very thoroughly before use, especially at the bottom of the can, to disperse the additive throughout the paint / coating. Preferably use a drill / whisk for at least two minutes.
Apply the paint in the normal way according to the manufacturer’s instructions.
General Product Information
Do not overcoat the anti-mould finish (or wallpaper over it) as this will effectively seal in the mould resistant finish and allow the mould to grow back.
N.B. – If an unfinished, textured wallpaper (blown vinyl, woodchip etc.) or similar is to be used then it should be hung after the Surface Cleanser has fully dried. The wallpaper should then be coated with the anti-mould finish as above.
Special Note
Areas that are subject to very severe or persistent mould growth may require treatment with one of the ready to use professional KAIR anti-mould coatings. Contact Technical Sales at the address overleaf for further details.
SAFETY PRECAUTIONS
Read all safety precautions carefully before you start. Avoid contact with skin. Wear suitable protective clothing, gloves and eye and face protection. In case of contact with eyes, rinse immediately with plenty of water and seek medical advice. In case of accident or if you feel unwell seek medical advice immediately. Keep pets and unprotected people away from treated areas until thoroughly dry.
Instructions for use
N.B. This kit contains enough Surface Cleanser to wash down approximately 30 – 40m² If you require less, mix accordingly (1 part Surface Cleanser to 19 parts water).
Store any unused concentrate in its original container tightly closed and out of reach of children. Diluted material should be decanted into a suitable plastic (NOT METAL) container and stored for future use. Mark the container with an indelible pen. Never use a food or drinks container and never leave a container unmarked.
Step 1
 Prepare the surfaces to be painted by removing any loose or flaking material (including wallpaper) and filling all cracks and defects in the normal way. (Any rubbing down and smoothing should be carried out before moving on to section b).
Step 2
 Pour the contents of the Surface Cleanser bottle into a bucket and make up to 5 litres with clean tap water.
Step 3
 With a soft cloth, sponge or soft brush, wash down all areas to be painted with the diluted surface cleanser taking care to remove any oil, grease or surface debris.
Allow to dry thoroughly.
Step 4
If necessary, apply an appropriate primer or sealer to bare metal or masonry surfaces. For new or porous plaster surfaces thin the first coat if necessary according to the manufacturer’s instructions. Allow enough time to dry thoroughly.
Step 5
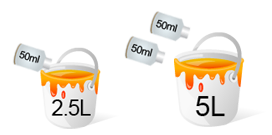 Carefully open the Mould Eradication Additive container and add the entire contents to the paint (1 x 50ml of Mould Eradication Additive is enough to convert 2.5 litres of standard paint into a mould resisting paint; 2 x 50ml of Mould Eradication Additive is enough to convert 5 litres of paint).
Step 6

MIX VERY THOROUGHLY BEFORE USE, especially at the bottom of the can, to disperse the additive throughout the paint. Preferably use a drill / whisk for at least two minutes.